

How To Set Up Macbook Air 2015
Did you lot just become a brand new MacBook? Whether it's a MacBook Air, MacBook Pro or the new MacBook Apple revived in early 2022 with the new keyboard technology and a Retina display, there are some steps users should take to become the most out of their calculator.
We'll evidence yous what happens the kickoff fourth dimension you beginning the MacBook and and so give you some tips for what settings to change, how to get updates and some accessories to install.
Before going too far, sign up for an Apple tree account. People who already own an iPhone, iPad or iPod Touch accept an Apple business relationship. If not, create one at Apple's website. Doing this early makes the setup process on the computer easier.
See How to Quickly Add a Dock Spacer to Your Mac Md
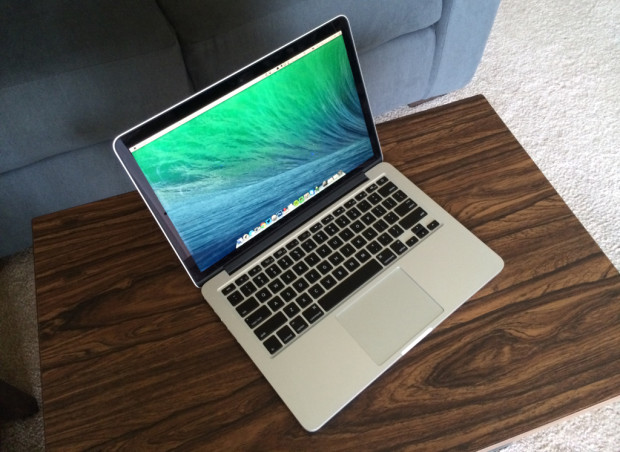
Open up the box and plug in the MacBook. It will ship with enough battery life to get started, simply it's still a good idea to charge up the bombardment to 100%.
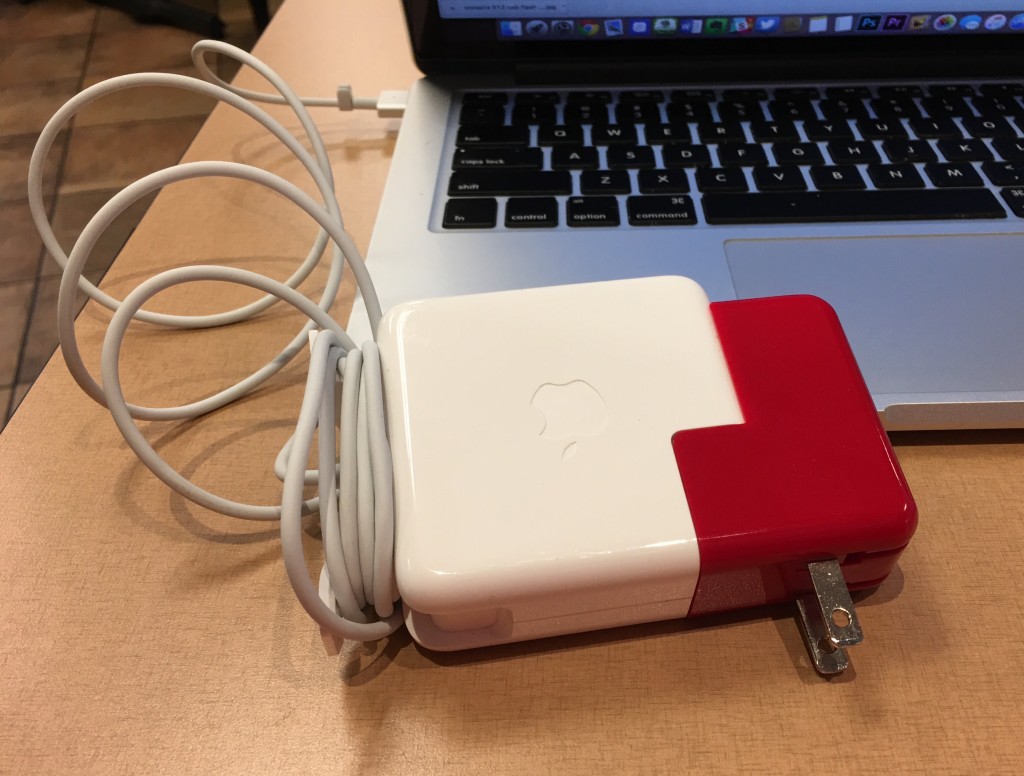
This is a MacBook Pro charger with a $45 Twelvesouth PlugBug on it instead of the Air conditioning connector that comes in the MacBook's box.
Attach the charger magnetically to the left side of the MacBook. The charger comes with an extension cable that plugs into the wall, just users can also plug the square white brick with rounded corners directly into the wall without the white rubber extension cord. You lot'll have to attach the included AC adapter into the brick. Attach the cord if y'all call back yous'll demand the actress length or leave it off if you don't demand the extra length. The new 2022 MacBook with Retina brandish doesn't include this extension cablevision any more than, only the MacBook Air and Pro yet practice.
Your MacBook will expect a lot similar the one in the unboxing video below showing the 2022 version.
Booting the New MacBook for the First Time
Open up the lid and press the ability button on the upper right corner of the keyboard.
The outset time the computer starts, it will ask a series of questions. First, tell the operating system what country y'all're in. Then select the language you want to use for your keyboard. A window pops upwardly offering to connect to Wi-Fi. Select your network and add the password, if the network has one.
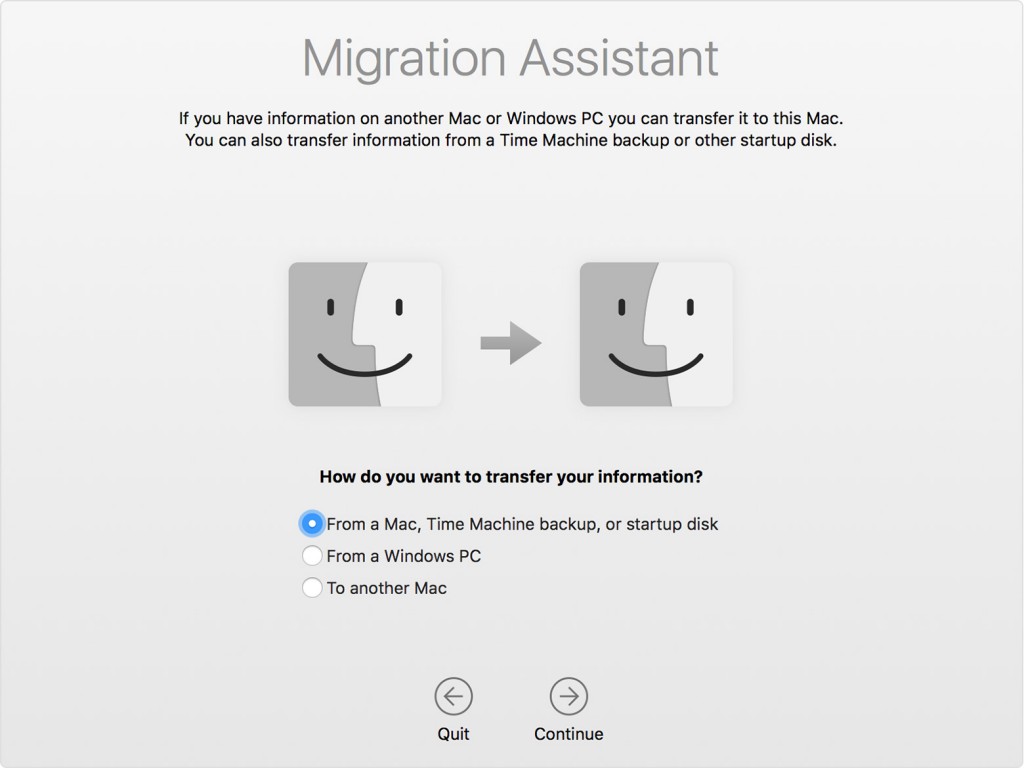
The MacBook will then ask to "Transfer Information to This Mac" and gives options. Apple offers a complete guide for using the Migration Banana to transfer data from another Mac, a Time Auto backup, another hard drive or a PC. The 3rd detail seen in a higher place lets users re-create things to another Mac. Y'all won't see this on the MacBook the offset time you lot boot. The in a higher place screenshot comes from the Migration Assistant app pre-installed in Bone X in the Applications, Utilities folder. The one used in the first boot sequences is slightly different, and so the third item reads, "Don't transfer whatsoever information at present." Click on Go on to move on after selecting the third detail.
Why not transfer files now? Information technology's faster to move files via a USB flash bulldoze like the one recommended beneath in accessories. Also, starting with a make clean system that doesn't include all the junk we accumulate over time will permit the computer run smoother. Accept the fourth dimension to set up the new MacBook upward manually instead. Copy your personal files using something like iCloud Drive, a sync tool like DropBox or OneDrive, or using a USB hard drive or flash drive.
The next few screens allow you lot …
- Enable locations services – plow this on if you want to employ things like Find My Mac or let apps find yous to detect contextual information related to where yous are.
- Sign into iCloud. iCloud syncs files from other Apple devices similar an iPhone, iPad, iPod Touch or other Macs. This likewise backs up central information like Photos, settings, and passwords.
- Plow on Find My Mac which helps you find the MacBook if information technology gets lost or stolen. Become to iCloud.com to discover information technology on a map.
- Agree to terms.
- Create a local user account or sign in using your Apple ID. I prefer the local user business relationship and use my first name and a good countersign to protect my data. I likewise bank check the box that asks if I want to use my Apple ID to reset the computer's password if I forget it.
- Choose to register the computer, which makes getting technical support easier.
The Mac will finish the boot sequence after churning away to prepare things upwards in the background. Wait patiently. It doesn't take a long time to finish.
Check out the Apple OS X MacBook quick start transmission. Information technology's got a lot of tips and instructions for using El Capitan.
Sign Into Apple Accounts
Apple forces the user to sign into their Mac what seems like a hundred times. You'll do it first during the boot process explained in a higher place. Open iTunes and the Mac App Store app and sign into both so that you tin buy media and apps.
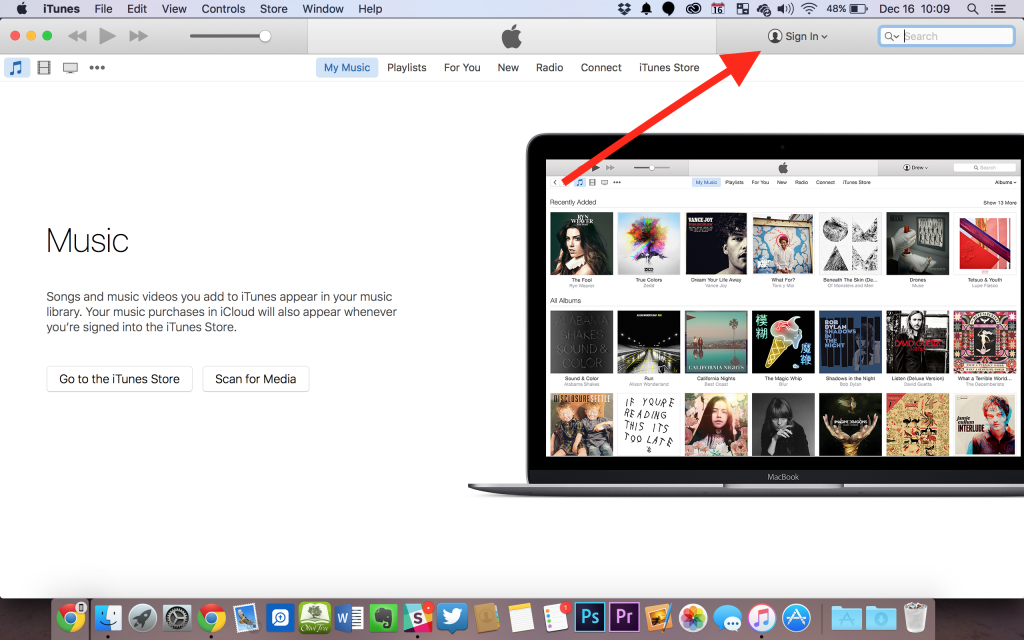
Sign into iTunes and so you tin can buy apps, music, movies and TV shows.
Open up iTunes, icon on the Dock with musical notation on top of white background. Click on the Sign In push on the top correct part of the program. Enter the user proper noun and password for your Apple business relationship. If yous share an iTunes account with a family fellow member other than your own Apple tree ID, you tin add that account instead of your account. Click OK when it finishes logging into iTunes.
The program volition ask you to enter payment data. Add a credit bill of fare or PayPal account so yous tin can buy content. If you lot already added payment data, simply confirm information technology. Apple will ask for your credit card's security code from the back of the carte. Enter your name, address and phone number and check accuracy. Click Done.
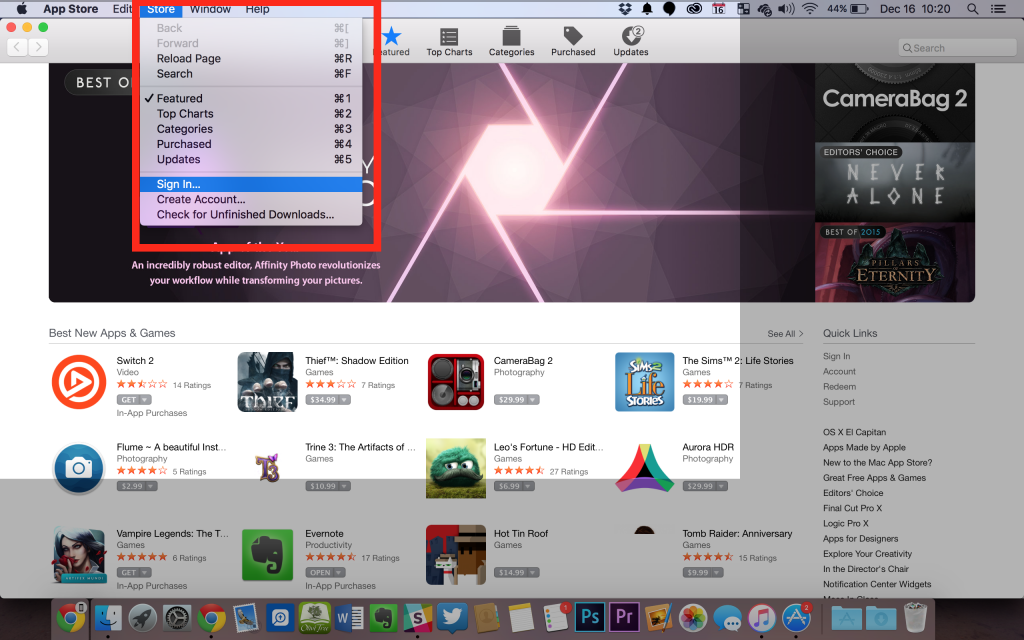
Open the Mac App Store and click on the Shop menu. Select Sign In from the drib down menu. Add your Apple ID and the password and click Sign In. Now it'south fix to download apps.
While here, click on the Updates tab at the right stop of the meridian toolbar. Let information technology search for updates and download any updates available.
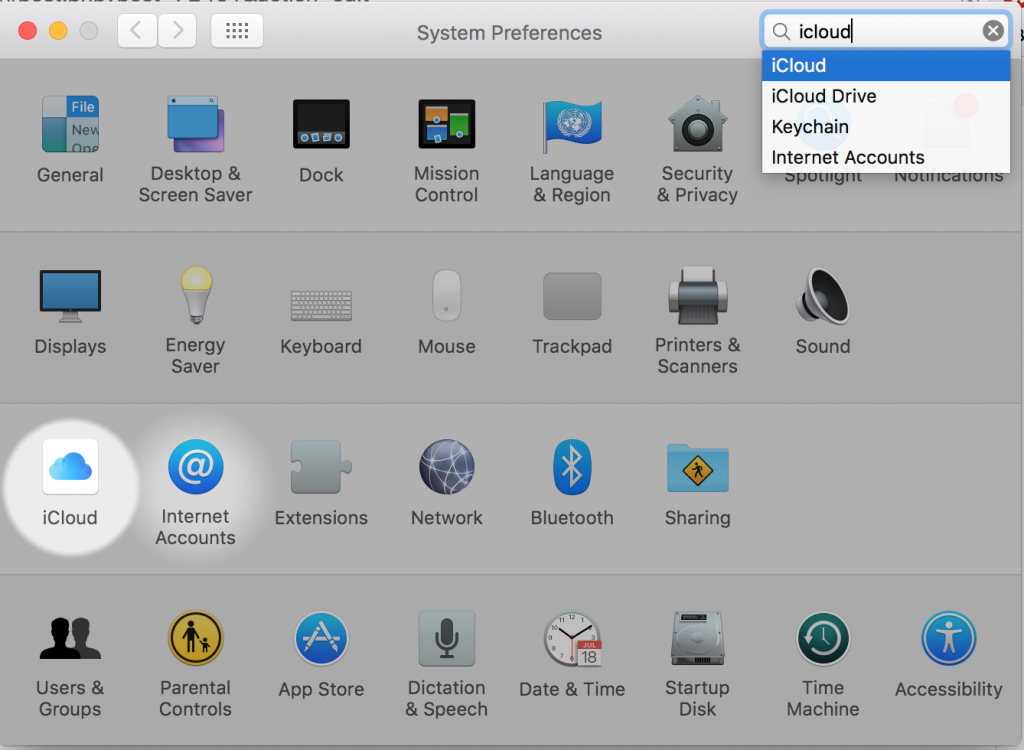
Open Organization Preferences from the Apple tree carte in the upper left or from the Dock on the right end and find iCloud in the 2d to last row at the left. If it doesn't already evidence your iCloud business relationship, which you might have entered during the first boot, sign in now. Cheque off the items you want iCloud to sync.
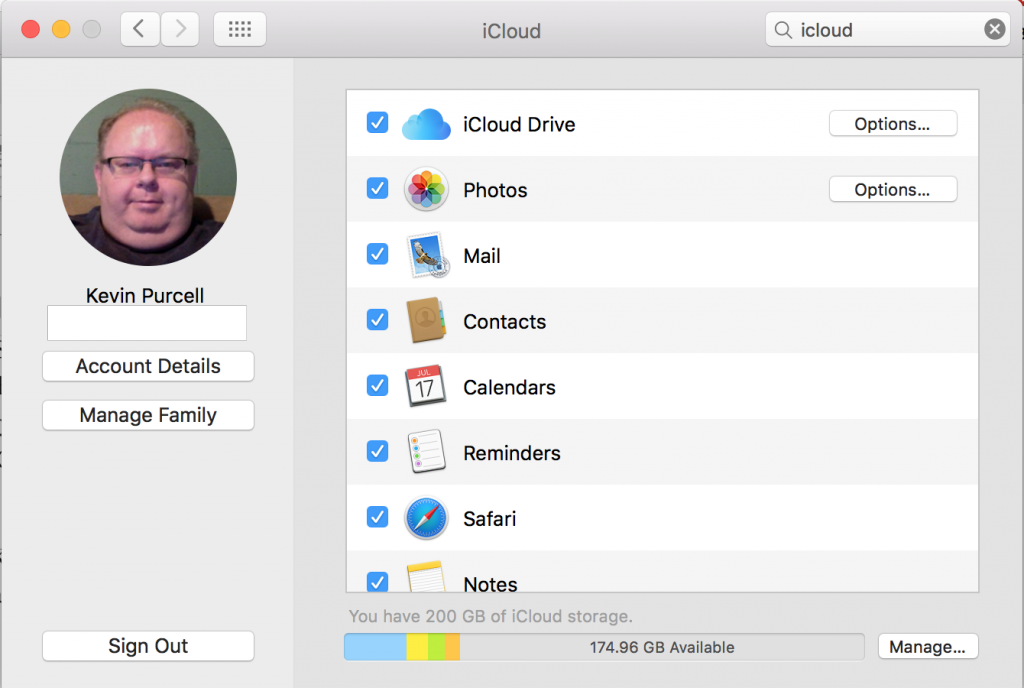
- iCloud Bulldoze – syncs files betwixt Macs and iOS devices for apps like Pages, Keynote, Numbers, iMovie and others; the Options button lets you cull which apps tin can apply iCloud Bulldoze.
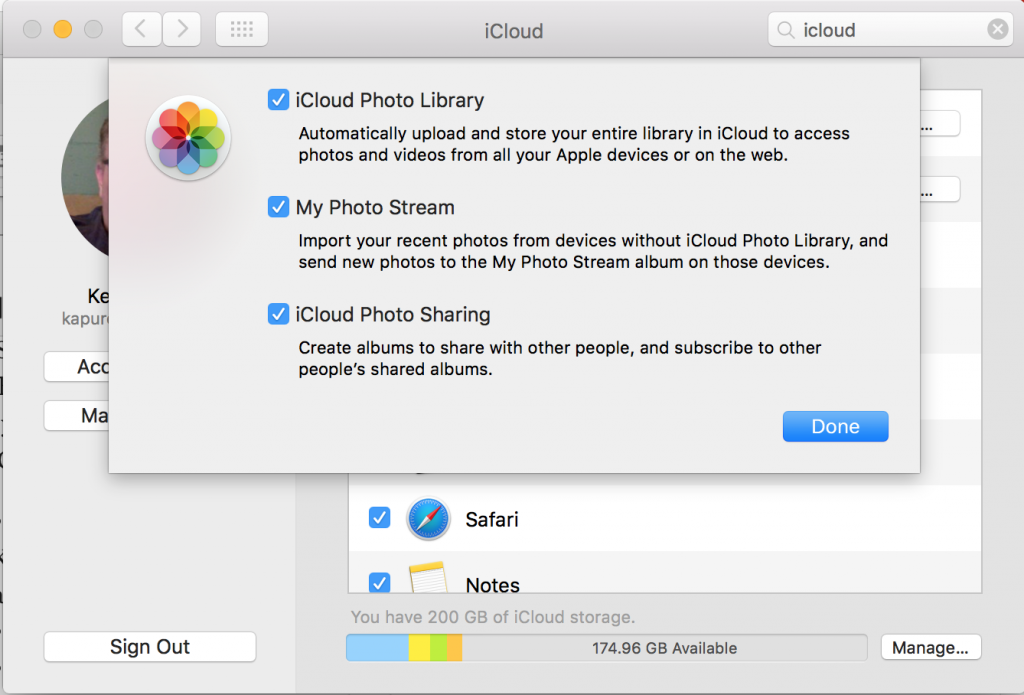
- Photos – syncs Photos on Macs and iOS devices. TheOptions button lets you choose options for turning on or off Photos library and photograph stream and shared libraries (come across below).
- Mail – syncs Mail accounts and email from your iCloud mail account.
- Contacts – syncs Contacts in iCloud.
- Calendars – syncs Calendars in iCloud.
- Reminders – syncs Reminders lists and private Reminders.
- Safari – syncs settings, bookmarks and other browser content.
- Notes – syncs notes.
- Keychain – lets users sync things like settings and passwords; the Options button turns on blessing Keychain sync using a security code or a telephone.
- Back to My Mac – lets you lot remotely control this computer from other Mac computers if it'southward turned on.
- Detect My Mac – lets you observe your Mac on a map from iCloud.com if this turned on.
Add together Your Third-party Internet Accounts
While the System Preferences app is however open up, add together third-party accounts. Click on Net Accounts, the icon right of the iCloud icon. This lets users add together third-party Internet accounts like Gmail, Yahoo and more.
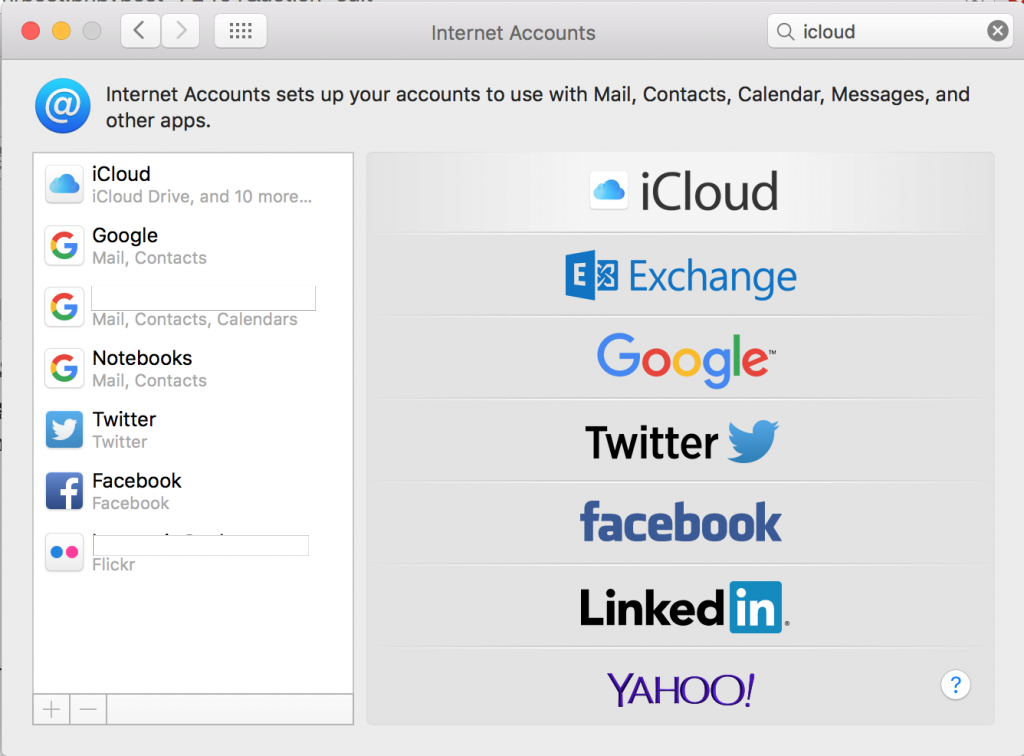
Add your Gmail, Yahoo, Facebook, Twitter or other third-party Internet accounts here.
If you haven't already, you tin can add iCloud here also. Nearly people volition add together things like Gmail, Facebook, or Twitter hither. The user needs their login information. Users who have a Microsoft Exchange business relationship for piece of work or school can add it hither likewise.
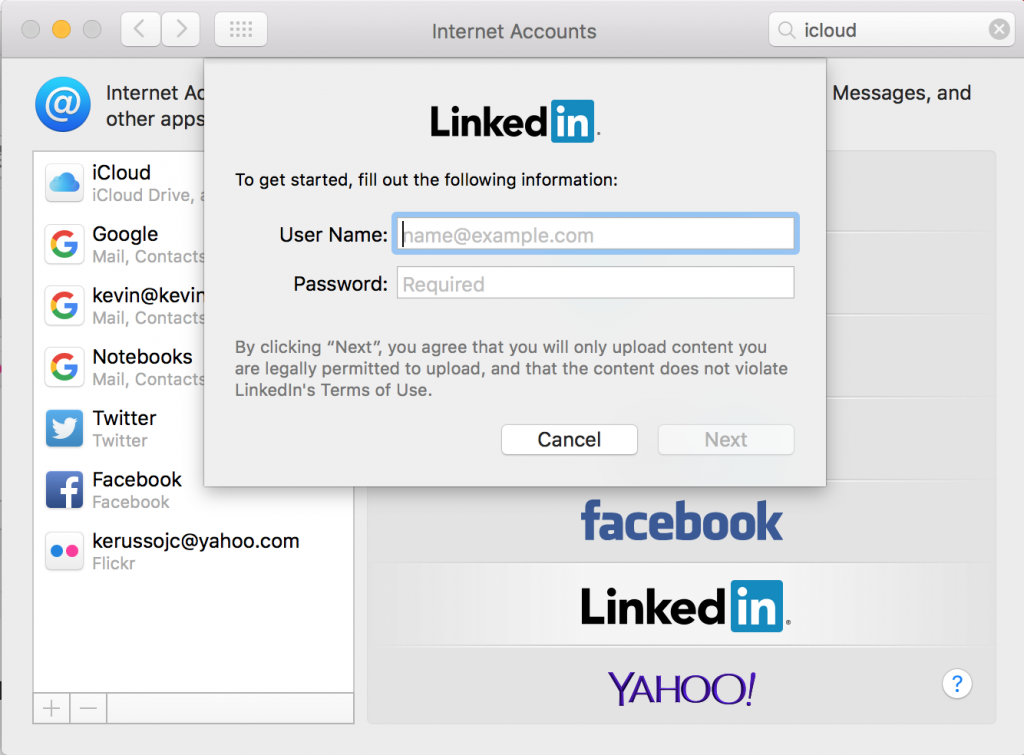
Click on the icon for the service yous want to add. Enter the user name and countersign for the account and click on Adjacent. For a few of these, clicking the icon brings upwardly a login page from the service. Yahoo does this. Add the user name or electronic mail address and the countersign and sign in.
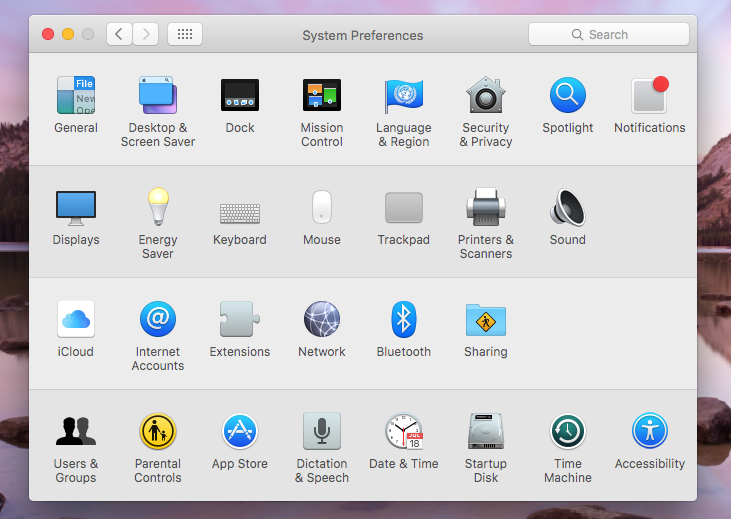
Change Cardinal MacBook Settings in System Preferences
The System Preferences app houses all of the major organization settings. Its icon looks like a blackness and gray gear and sits in the dock. It's too accessible from the Apple tree menu in the upper left corner on the Bill of fare Bar.
See 10 OS Ten El Capitan Settings to Change
If you ever need to find a particular setting but can't think where it is, enter the setting name in the Search box. In improver to the settings mentioned in the previous link, look at the post-obit changes to brand.
I unremarkably starting time with the top row of settings and open and set things equally I prefer. The Full general and Desktop & Screen Saver stay the same on my systems since I similar the default settings, but you lot may prefer to open those to customize the look of OS Ten. I start with the Dock settings.
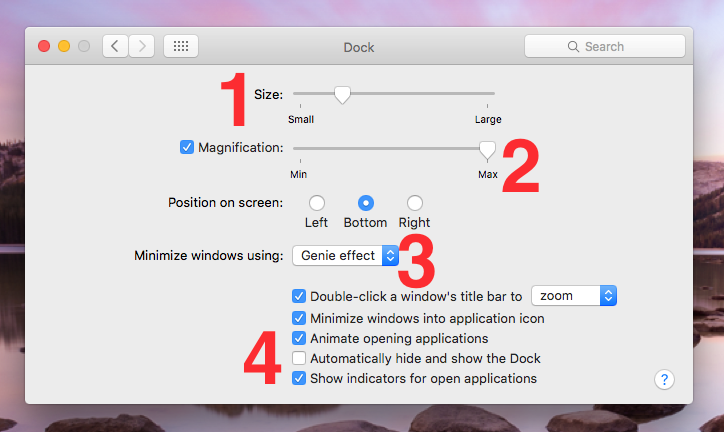
Here's what I change:
- Shrink the Dock so that it takes up less screen space.
- Turn off or change the Dock magnification settings. When the cursor hovers over the dock information technology will grow in size so the user can meet the icon amend. This annoys a lot of people so uncheck the check box if that describes you. People with poor eyesight like me instead fix this so the icons grow large.
- Change the position of the dock if you lot like. I prefer information technology along the bottom, but some want it on the left edge or correct border of the screen.
- Change the five check boxes below the Dock position setting as you lot prefer. One that many like to change is the fourth item on the list. Cheque it to make the Dock go abroad until you hover over the bottom edge of the screen with the mouse.
If your MacBook gets plugged in and left on in your bedroom or dorm room, open the Notifications setting and turn on the Exercise Not Disturb feature.

Users can fix a fourth dimension to turn on/off Do Not Disturb automatically. This keeps the computer from making noise or notifying the user about things similar appointments. Also, the user tin just turn it off when the screen is in slumber manner or when the user mirrors the display to a TV or a projector, either through AirPlay and Apple Telly or through the display output connections (HDMI or mini-Display).
See How to Put a Calculator in the Mac Notifications Center
The bottom two items let for exceptions letting the two categories of notifications through even when Do Not Disturb is on.
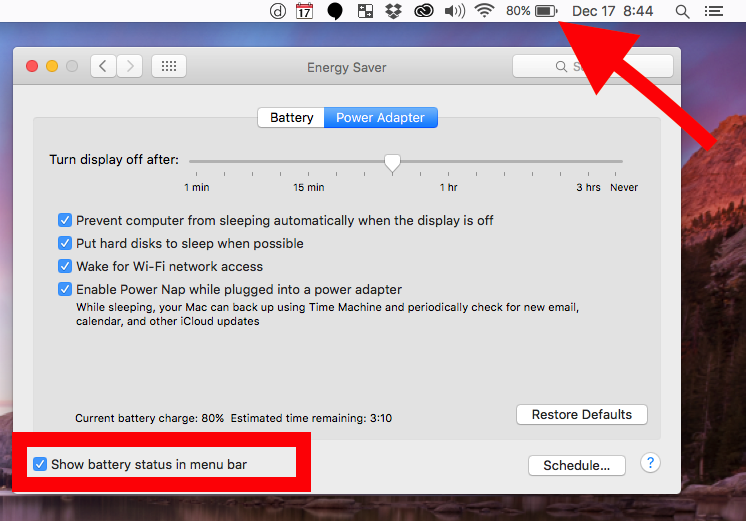
Next, open up the Energy Saver setting. It organizes things into two tabs, Bombardment and Power Adapter. Set the slider labelled Turn brandish off after: in each tab to your preferred level. I don't like the default of 2 minutes when running on battery, but some may wish to leave information technology here to go more battery life. I change it to 5 minutes.
While plugged into a Ability Adapter, I prepare it to turn off the display later on ane hour, longer than the default. I practise this because I but have the computer open and plugged in when I'1000 making presentations or need it to stay on.
Finally, I make sure that the Show battery status in menu bar gets checked. This puts a battery life indicator in the Bill of fare Bar at the tiptop of the screen. That's the default, then exit information technology unless you don't want it showing up on the Menu Bar.
I as well like to foreclose the reckoner from going to sleep when the display is turned off while plugged in. I practise that so that one piece of software, which I install, perform maintenance overnight.
The Keyboard settings lets users change things like Key Repeat, shortcuts and more. Open the Setting and select the Keyboard tab first. Here'due south what I modify.
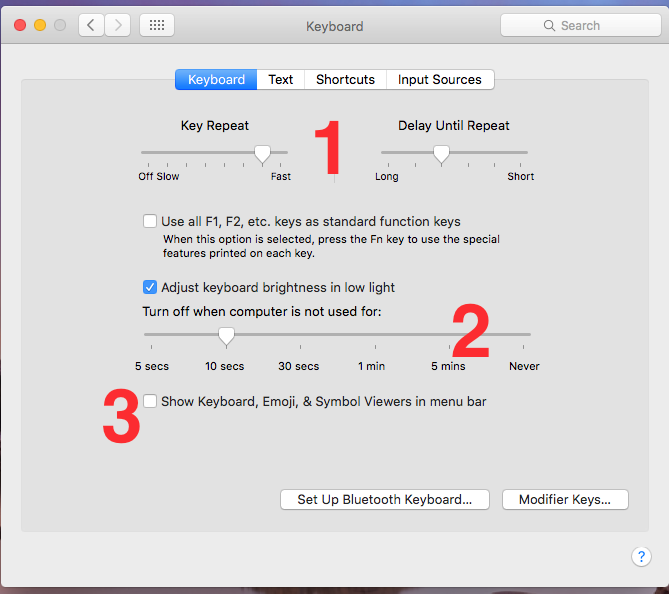
- I increase the Key Repeat charge per unit and the Filibuster Until Repeat.This makes the input cursor work faster when I press and hold a central like the space bar to enter a bunch of spaces repeated.
- Change the length of time the keyboard backlight turns off. Increment it if y'all don't care most bombardment life or decrease it to become more battery life.
- Show Keyboard puts a keyboard icon in the Menu Bar if you need to change betwixt various keyboards, like from English to another language.
On the Text tab, I add together keyboard shortcuts for usually used text strings like my phone number, accost, email addresses, and website addresses. Click on the plus icon below the list of text replacements. First, enter the shortcut in the box that shows up in the left manus column. For case, if you're adding a shortcut for your email accost, enter the showtime part of the e-mail. I put the showtime few letters of my email addresses. If the accost is [email protected] then enter something like [email protected] And so in the second box at the bottom of the right side column enter the full email address.
On the same tab, some people hate the automatic replacements and turn this off by unchecking the box. If you lot do this, the replacement shortcuts you lot merely set up will not work.
The other two tabs let you add together shortcuts in programs and add boosted keyboard languages. I never change these.
Apple offers a ton of built-in keyboard shortcuts that volition speed upwardly your work. Learning these can assist users become more than proficient in Os X.
In the Mouse and Trackpad settings pages, many people turn off Apple'south Natural Scrolling which scrolls backwards compared to the traditional way of scrolling.
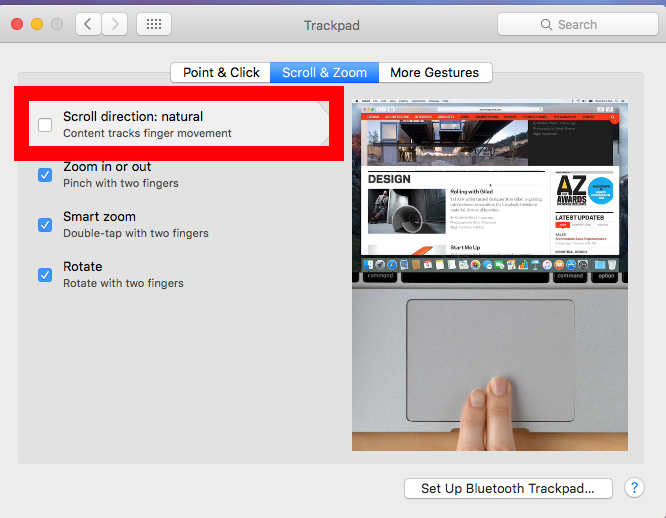
If you effort scrolling and information technology feels like information technology'southward going backwards, you will want to modify this setting. Open the Mouse or the Trackpad settings, whichever y'all're using. Click on the center tab labelled Curlicue & Zoom. Uncheck or check the Whorl direction: natural particular at the top of the list of check boxes. The animated GIF on the right shows how to utilise the Trackpad or Mouse the style y'all have it set.
Check out the other two tabs and alter things as you adopt in those places.
If you ain a printer, open the Printers & Scanners setting to add your printer and change its settings. Use the plus icon to add together a new printer. If y'all plug in the printer's USB cable, it should observe the software and install information technology. If information technology doesn't, you'll need to install the printer/scanner drivers that came with it.
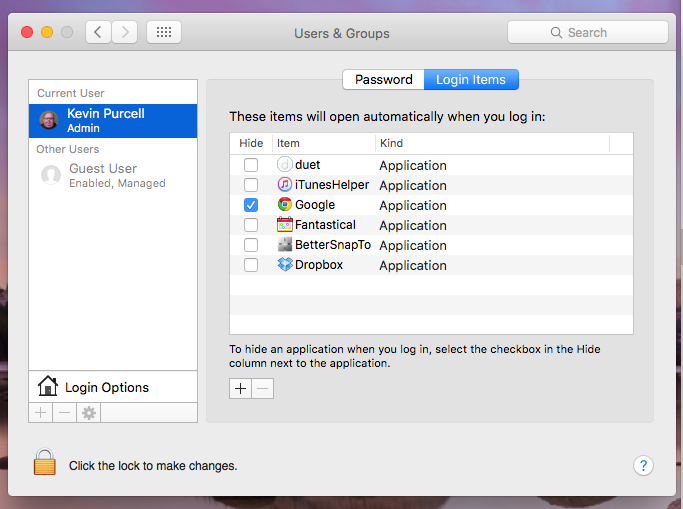
Next, open the Users & Groups setting. Observe your user name setup during the first kicking section above. Click on Login Items. This shows a list of programs or apps that will load automatically each time you log into your user account. If you come across something you don't need, select it and click on the minus button below the list box to remove it. Unchecking the box only makes it load without showing your things like splash screens. This might speed up the estimator a bit, if a bunch of these load. Y'all won't run across that many things on the list until y'all start installing software.
Do you desire to cease Os X from installing app and operating organisation updates? Open the App Store setting and uncheck any of the items in the list yous want to turn off. For case, some like getting notified of app updates, but don't desire them to download or to install automatically.
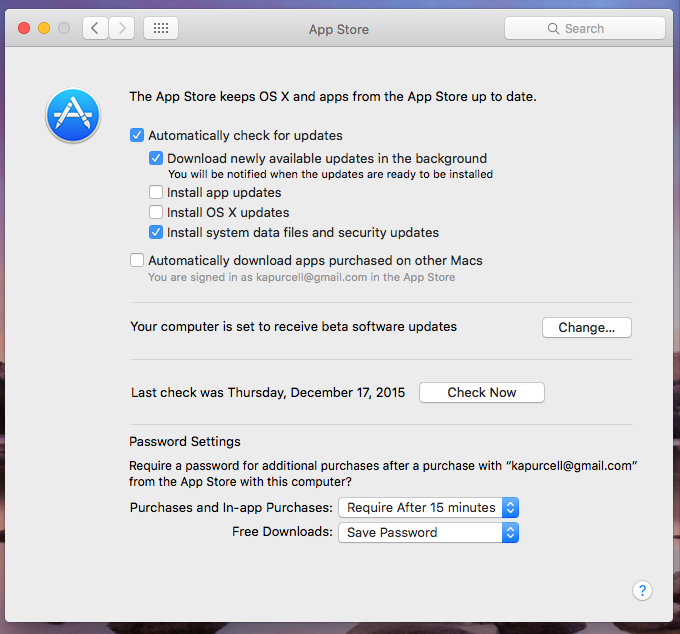
I like to automatically check for updates and take them download in the background, just I desire to determine when to install them. However, I want system data files and security updates installed automatically then my system's never vulnerable to security bug.
Don't forget to gear up Time Automobile. This backs upwards your MacBook every hr so you never lose data. It only works when you're continued to an external difficult bulldoze, then make certain to plug in periodically to your fill-in bulldoze.
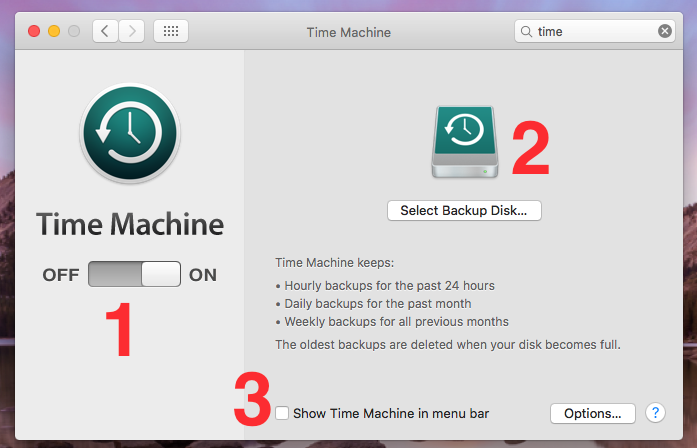
Plug in the drive and then open the Fourth dimension Machine setting, if the operating system doesn't offer to open it for yous. Turn Fourth dimension Automobile on (see #i above) and then select the drive (#2) to back up the system to (if it didn't open when you plugged in your new bulldoze). If you desire admission to Time Machine, without opening System Preferences, then bank check the box (#three) at the bottom of the screen to turn on the Carte Bar icon.
Get the Latest Software and Bone Updates
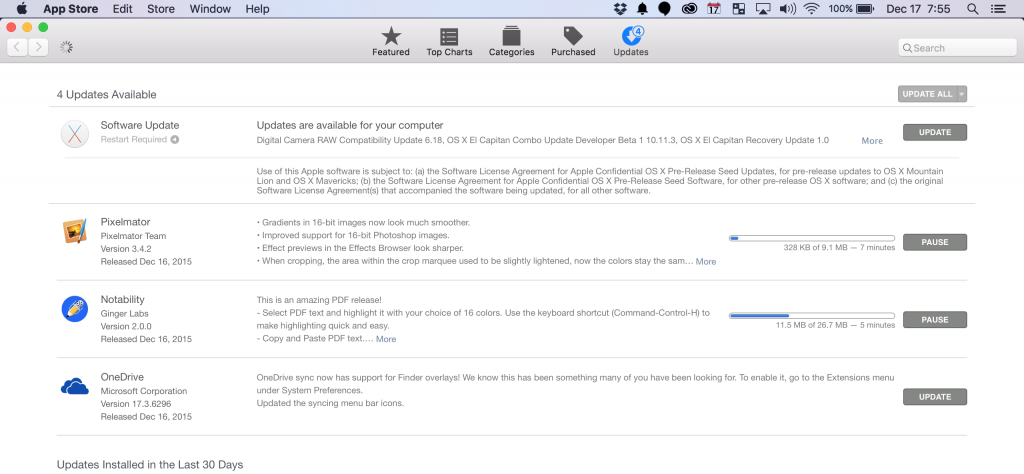
Open the App Shop and click on the Updates tab.
If you didn't already get the latest versions of the operating system and apps from the Mac App Shop above, do and so at present. Open the Mac App Shop and click on the Updates tab on the right end of the toolbar at elevation. Let it search for updates and download them. If the computer includes an operating organization update, it will ask to Download and Restart. Let information technology and go take a break until it finishes. This take up to 30 minutes depending on how fast your MacBook runs.
Other apps won't enquire to restart the system, simply oftentimes the user will need to go out apps running in the background. You lot probable won't have many of those installed at this early point.
Grab Some MacBook Accessories
The first accessories users should consider getting include a overnice reckoner bag, a mouse, MacBook cover, dongles and other useful devices. Here's a list to consider.

- MacBook calculator purse – nosotros like WaterField Designs computer bags. My current favorite is the Bolt Briefcase or the Staad Backpack.
- MacBook encompass – we really like the Moshi iGlaze for the MacBook Pro. Moshi carries other MacBook covers and cases too.
- Mouse – the MacBook glass trackpad is the best in the industry, but some people still prefer a mouse. The Logitech Ultrathin Mouse (link shows other absurd accessories likewise) is my favorite. It works a lot similar the Apple Magic Mouse simply is smaller.

- Dongles and Adapters – Apple loves dongles for some reason. If you've got a new MacBook with the Type-C USB connector, you lot'll need dongles to connect to HDMI, regular USB, VGA, DVI or Ethernet.
- Twelvesouth PlugBug World – This adds a USB charger port on your MacBook charger. The MacBook charger comes with a detachable piece that holds the AC connector so users can swap out International connectors. Twelvesouth uses this design to substitute their PlugBug that includes a USB port.
- Backup Storage – Nosotros talked about setting up Fourth dimension Motorcar in a higher place. A fast external difficult drive will make this a better experience. Look for a few things. If you can afford information technology, buy an SSD that matches the MacBook'southward storage size. If yous have a 256GB bulldoze in your MacBook, and so get at to the lowest degree a 256Gb external drive. If cost is the most important affair, then catch a large bulldoze like the 1TB drive. They cost $50-$75 for slower portable drives.

This Corsair 512 USB Flash Bulldoze costs over $300 but it will let you back up your MacBook in an extremely portable way.
- Apple tree Idiot box – The new Apple Telly is a bang-up streaming set-tiptop box all by itself, but paired with a MacBook via AirPlay it becomes a second display for doing presentations or watching media stored on your Mac. Y'all can too import the videos into iTunes and use the Apple TV's feature that lets information technology stream media from iTunes on the Mac. It also plays games and lets users install other third-party apps.
Now it's time to install your favorite software and apps (see our list of 18 and our list of lxx nifty Mac apps). Then savor your new MacBook.

How To Set Up Macbook Air 2015,
Source: https://notebooks.com/2015/12/24/set-new-macbook/
Posted by: cromwellliffe1989.blogspot.com
0 Response to "How To Set Up Macbook Air 2015"
Post a Comment